Sorry, no products matched your criteria.
Glazing
All our products come with loose glazing for site fitting unless requested otherwise, Please ensure the glazing practice is followed to uphold the units warranty.
| Glazing practice | |
| Brinard Joinery recommend the use of timber glazing beads for both stained and painted windows, whether single or double glazed. Most window types are supplied complete with matching glazing beads, pinned loose to the frame rebate. | |
| Unless otherwise advised, windows when factory double glazed, will be fitted with annealed glass. | |
| Feature frames and front entrance frames will continue to comply with safety requirements for glazing into risk areas as defined in BS6262: 1982. | |
| When measuring for glass, note that the tight rebate size should be reduced to allow a tolerance. It is recommended that the glass is ordered 6mm (1/4″) less in height and also 6mm less in width. This will allow tolerance of 3mm (1/8″) around all the edges of the glass. For patterned glass, the smoother of the two glass surfaces should be to the outside. This makes the glass easier to clean, simplifies painting and also improves weather sealing. | |
| Glazing | |
| It is recommended that all glazing rebates and beads are fully finished including the mitres before installing the glass. | |
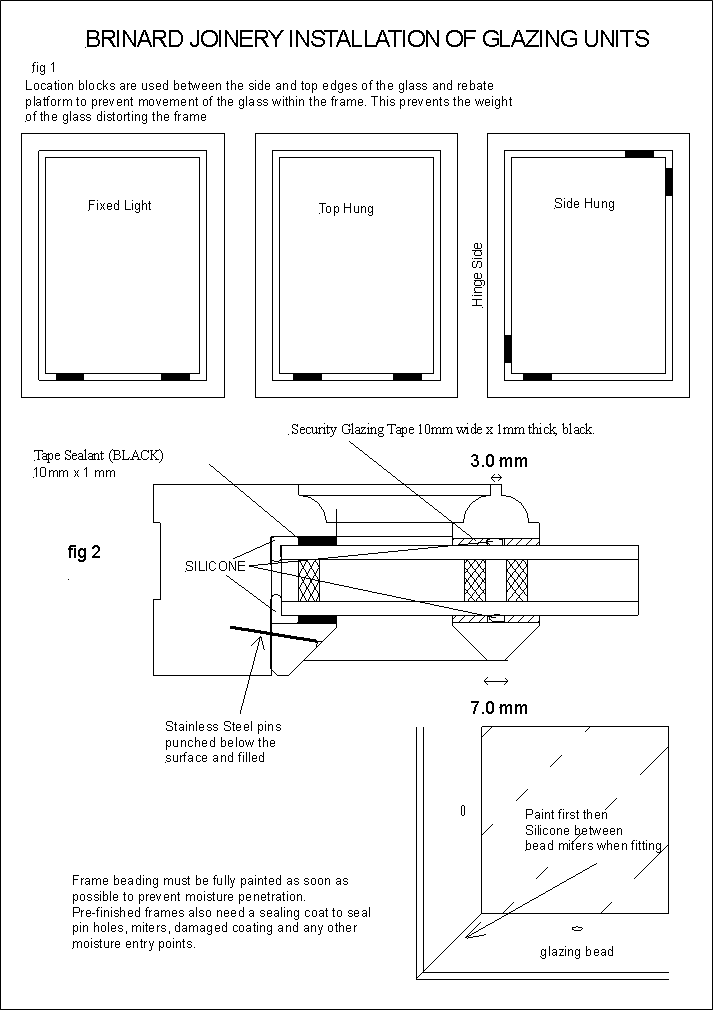
| Ensure that the glazing rebates and the glass are clean and dry, Remove the protective tape from the edge of the glass, Stick the glazing tape around the perimeter of the top of the glazing rebate and the top edge of the bead, Take care on the corners to prevent any gaps. | |
| Remove the backing tape from around the frame, Put a bead of silicone around the glazing rebate under the glazing tape and across the corners . | |
| Place glazing packers into the glazing rebate then place the glass onto the packers in the rebate, Gently press the glass into the rebate and pack as shown in fig 1 ensuring an even gap all around. | |
| Seal the gap between the glass and frame with silicone sealant , remove the backing tape from the bead then press the beading into place with a small amount of silicone on the mitres to seal any gaps as shown in fig 2 | |
| Pin the beads in using stainless steel pins punched below the surface and filled, | |
| Clean off any excess silicone asap with industrial wipes. | |
| It is very important to recoat the beads and any damaged areas with a sealing coat straight away to prevent moisture penetration | |
| Site glazing must be carried out in accordance with the requirements of BS8000: Part 7. Your attention is also drawn to the NHBC Standard – Chapter 6.7 Clause D7(c) which requires a drained and vented bottom bead. | |
|
|


